Be sure to read our policy on citing sources before editing!
Difference between revisions of "Hag 1"
(reorganize) |
|||
| (116 intermediate revisions by 48 users not shown) | |||
| Line 1: | Line 1: | ||
{{Infobox | {{Infobox character | ||
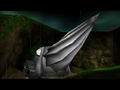
|image = | |image=[[File:Hag 1.png|250px]]<br>The Hag 1 in ''Banjo-Tooie'' | ||
| | |game=''[[Banjo-Tooie]]'' | ||
|world=[[Cauldron Keep]]}} | |||
{{quote|Feel the power of that {{wp|V10 engine|V10}} beast..|[[Gruntilda]]|[[Banjo-Tooie]]}} | |||
|game = [[Banjo-Tooie]] | The '''Hag 1''' is an object in ''[[Banjo-Tooie]]''. | ||
|world = [[Cauldron Keep]] | |||
| | |||
| | |||
| | |||
| | |||
}} | |||
The Hag 1 is | ==Location and uses== | ||
The Hag 1 is a drill-equipped {{wp|Amphibious vehicle|amphibious}} tank used by [[Gruntilda]], [[Mingella]] and [[Blobbelda]]. It uses a {{wp|V10 engine}} and runs on [[Bigga-Bazza!]] batteries. It was designed by [[Ed Bryan]].<ref>[https://twitter.com/ItsMingyJongo/status/682274420052914176 Ed Bryan on Twitter: "@RareWarefan1985 @Ghoulyboy Terry, Minjy and HAG-1 where mine. Great drawings!" / Twitter] ([https://web.archive.org/web/20221116022039/https://twitter.com/ItsMingyJongo/status/682274420052914176 archive.org])</ref> | |||
The Hag 1 is first seen in the intro, where Mingella and Blobbelda use the Hag 1 to go through the [[Isle o' Hags]] and reach [[Spiral Mountain]], where they lift a large boulder off [[Gruntilda]]. After being freed, Gruntilda gets revenge on [[Banjo]], and the three sisters retreat into the Hag 1 and go back to [[Cauldron Keep]]. The Hag 1 does a lot of damage on its way back, and creates a large hole in the wall of Spiral Mountain. When Banjo and [[Kazooie]] enter [[Jinjo Village]], they learn that the Hag 1 drove into the Gray Jinjo House, killing every member inside. | |||
More evidence of the Hag 1's damage shown from the trails it left in most hub areas (except [[Cliff Top]]). In [[Pine Grove]], the Hag 1's trail goes underwater. In both [[Wasteland]] and [[Quagmire]], the Hag 1 climbs vertical walls. | |||
When Banjo and Kazooie reach the [[Hag 1 Boss Area|roof of Cauldron Keep]], they find Gruntilda inside the Hag 1, where it is subtitled "Monstrous Mechanical Mud-muncher." She attacks them violently with it, making use of the Hag 1's various abilities, including poisoning the air surrounding the machine. During the battle, Gruntilda appears to have difficulty operating the Hag 1, as she needs help to use the tank's weapons. Kazooie manages to destroy the Hag 1 by shooting a [[Clockwork Kazooie Egg]] into the main engine chamber. | |||
Gruntilda | ===Battle=== | ||
====Phase 1==== | |||
The first phase starts with Gruntilda turning on two lasers on the opposite corners of the Hag 1 and spinning. They are easy to avoid, being fairly slow and simple to jump over. Eventually, Gruntilda will pop out of the tank's hatch ask a question. These questions differ from the ones asked in the [[Tower of Tragedy Quiz]] and have a time limit of 5 seconds to be answered. If the answer is correct, Gruntilda's next attack will be slower, however, if it's wrong, the attack will be faster (quickly enough for not even the [[Cheato Page|HONEYBACK cheat code]] to be able to regenerate in time). | |||
The duo will then have to switch to the [[Breegull Blaster]] mode and fire eggs at Gruntilda (aiming upwards) until her health drops to 90. After that, she will go back to inside the vehicle and drop two [[Honeycomb]]s (which won't disappear, making it possible to save them for later). | |||
====Phase 2==== | |||
Gruntilda turns two more lasers and starts spinning, but much faster than it did in the previous phase. Again, it is simple to avoid them by simply jumping, although the [[Talon Trot]] can also be used (which is not recomended, as when the duo eventually needs to switch to the Breegull Blaster mode, they'll be facing the wrong way and trotting around the tank too quickly will cause it to change directions, giving the two no chance to avoid the lasers). | |||
Gruntilda will eventually stop, giving the duo a chance to attack. The way to damage her is the same as the one used in the previous phase. | |||
=== | ====Phase 3==== | ||
In the third phase, Gruntilda will deactivate the lasers and activate a mortar cannon. To avoid the next attack, Banjo and Kazooie must use the Talon Trot and run around the Hag 1, which will spin and eventually stop to fire the cannon. It is easy to avoid the projectiles by jumping over them while still using the Talon Trot. When the Hag 1 stays still for longer than normal, the duo must face it for Gruntilda to then ask a question. Like in the previous instances, answering correctly will slow down her attack. | |||
correctly | |||
After she finishes attacking, use the Breegull Blaster to lower her health to 70. | |||
70 | |||
====Phase 4==== | |||
In the fourth phase, Gruntilda will activate another mortar cannon. Her attacks will be mostly the same as the ones she used in the previous phase, but spinning faster, shooting larger projectiles and in four more directions. The way to avoid the attack is still the same, being to use keep moving and jumping over the projectiles while using the Talon Trot. Gruntilda will eventually ask a question again, and choosing the right answer will slow down her next attack. | |||
Use the Breegull Blaster and shoot at Gruntilda again to get her health to 60 HP. | |||
====Phase 5==== | |||
Gruntilda fetches the mortar cannons back, opens the exhaust port, activate two lasers in the front and activates the drill. She attacks similarly to how she did in the first phase, but due to the air coming out from the port, Banjo and Kazooie will recieve damage if coming in contact with it. The Hag 1 will attack by spinning around and then move forward to chase the duo. To avoid taking damage, use the Talon trot to try staying behind the tank for as much time as possible, until Gruntilda will pop out and ask a question that, like previously, choosing the wrong answer will make the next attack be faster. | |||
Use the Breegull Blaster to shoot at Gruntilda and drop her health down to 50 HP, but watch out for the lasers which are still turned on and limit the area available to move. The engine will then falter, giving the opportunity to use the [[Clockwork Kazooie Egg]] to enter the exhaust port (which temporarily stopped releasing air) and explode a battery while avoiding enemies. | |||
=== | ====Phase 6==== | ||
The sixth phase works much like the previous one, but faster, with all lasers active and changing directions more suddenly. Also like the previous phase, stay behind the tank to avoid being damaged. Gruntilda will then ask a question to give the duo the opportunity to make her next attack slower. | |||
Again, shoot and bring her health down to 40 while watching out for the still activated lasers. The engine will get defective, giving another opportunity to use the Clockwork Kazooie Egg to enter inside the vehicle and explode another battery. | |||
====Phase 7==== | |||
Now that both batteries are destroyed, the Hag 1 will shut down, making Gruntilda angry. She will then start shooting spells at Banjo and Kazooie. Use the Breegull Blaster to get her health down to 30. | |||
====Phase 8==== | |||
Gruntilda will start sending [[Minion]]s out of the hatch to attack the duo, giving more things to avoid while trying to shoot Eggs at her with the Breegull Blaster and drop her health to 15. These enemies can be used to get Honeycombs, seeing as they sometimes drop them when defeated and attacking one causes another to appear. To defeat them without wasting ammo, use the [[Beak Bayonet]]. | |||
====Phase 9==== | |||
Gruntilda will release a purple "cyanide and mustard-flavored" toxic gas into the air and releasing two Minions, limiting Banjo and Kazooie's time to defeat her. This can be difficult without all 10 oxygen bubbles acquired from [[Roysten]]. Continue shooting eggs with the Breegull Blaster at her while avoiding the enemies to drop her health to 1. | |||
=== | ====Phase 10==== | ||
Both the gas and the enemies disappear and Gruntilda starts to prepare the "biggest, baddest spell [she] can muster" and accidentally reveals her last name, Winkybunion. While she charges the spell, keep moving and shoot an egg at her. This will make her "drop" the spell inside the tank's hatch and explode the entire Hag 1 alongside herself, finally ending the battle. | |||
=====Attack list===== | |||
*'''Gruntilda''' | |||
**Slow Green Fireball | |||
**Fast Green Fireball | |||
**Hyperspeed Purple Fireball | |||
*'''Hag 1''' | |||
**Lasers (one on each of the four corners) | |||
**Mortar cannons | |||
**The drill | |||
**Infinite [[Minion|enemies]] | |||
**Toxic gas | |||
===''Banjo-Kazooie: Nuts & Bolts''=== | |||
In ''[[Banjo-Kazooie: Nuts & Bolts]]'', the Hag 1 can be seen in the introduction of the game where a narrator is retelling the story of ''[[Banjo-Kazooie]]'' and ''Banjo-Tooie''. | |||
The | ==Gallery== | ||
===''Banjo-Tooie''=== | |||
<gallery> | |||
Hag 1 BT intro.png|The Hag 1 in the opening scene. | |||
Hag 1 BT behind.png|The Hag 1 preparing to attack Banjo and Kazooie. | |||
Grunty in Hag 1 B-T.png|Gruntilda inside the Hag 1. | |||
Hag 1 BT explosion.png|The Hag 1 explodes. | |||
</gallery> | |||
==Nomenclature== | |||
{{Foreign names | |||
|Spa = Hag 1<br>Monstruo Mecánico Traga-Barro | |||
|SpaM = -<br>Mud Swallowing Mechanical Monster | |||
|Ger = Hag 1<br>Großer Gräßlicher Grubengräber | |||
|GerM = Hag 1<br>Big Horrible Dug Digger | |||
|Ita = Strega 1 | |||
|ItaM = Witch 1 | |||
|Fra = Sorcière 1 | |||
|FraM = Witch 1 | |||
|Jap = マジョ1ごう モンスターメカニカルマッドマシン | |||
|JapM = Witch #1 Monster Mechanical Mud Machine}} | |||
== | ==Trivia== | ||
*A GB plate at the rear of Hag 1 is a nod to Great Britain, [[Rare Ltd.]]'s country of origin. | |||
==References== | |||
<references/> | |||
=== | {{BT}} | ||
[[Category:Vehicles]] | |||
[[Category:Bosses]] | |||
[[Category:Bosses in Banjo-Tooie]] | |||
[[ | |||
Latest revision as of 15:35, December 10, 2023
 The Hag 1 in Banjo-Tooie | |
| Game(s) | Banjo-Tooie |
| World(s) | Cauldron Keep |
- “Feel the power of that V10 beast..”
- —Gruntilda, Banjo-Tooie
The Hag 1 is an object in Banjo-Tooie.
Location and uses[edit]
The Hag 1 is a drill-equipped amphibious tank used by Gruntilda, Mingella and Blobbelda. It uses a V10 engine and runs on Bigga-Bazza! batteries. It was designed by Ed Bryan.[1]
The Hag 1 is first seen in the intro, where Mingella and Blobbelda use the Hag 1 to go through the Isle o' Hags and reach Spiral Mountain, where they lift a large boulder off Gruntilda. After being freed, Gruntilda gets revenge on Banjo, and the three sisters retreat into the Hag 1 and go back to Cauldron Keep. The Hag 1 does a lot of damage on its way back, and creates a large hole in the wall of Spiral Mountain. When Banjo and Kazooie enter Jinjo Village, they learn that the Hag 1 drove into the Gray Jinjo House, killing every member inside.
More evidence of the Hag 1's damage shown from the trails it left in most hub areas (except Cliff Top). In Pine Grove, the Hag 1's trail goes underwater. In both Wasteland and Quagmire, the Hag 1 climbs vertical walls.
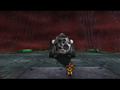
When Banjo and Kazooie reach the roof of Cauldron Keep, they find Gruntilda inside the Hag 1, where it is subtitled "Monstrous Mechanical Mud-muncher." She attacks them violently with it, making use of the Hag 1's various abilities, including poisoning the air surrounding the machine. During the battle, Gruntilda appears to have difficulty operating the Hag 1, as she needs help to use the tank's weapons. Kazooie manages to destroy the Hag 1 by shooting a Clockwork Kazooie Egg into the main engine chamber.
Battle[edit]
Phase 1[edit]
The first phase starts with Gruntilda turning on two lasers on the opposite corners of the Hag 1 and spinning. They are easy to avoid, being fairly slow and simple to jump over. Eventually, Gruntilda will pop out of the tank's hatch ask a question. These questions differ from the ones asked in the Tower of Tragedy Quiz and have a time limit of 5 seconds to be answered. If the answer is correct, Gruntilda's next attack will be slower, however, if it's wrong, the attack will be faster (quickly enough for not even the HONEYBACK cheat code to be able to regenerate in time).
The duo will then have to switch to the Breegull Blaster mode and fire eggs at Gruntilda (aiming upwards) until her health drops to 90. After that, she will go back to inside the vehicle and drop two Honeycombs (which won't disappear, making it possible to save them for later).
Phase 2[edit]
Gruntilda turns two more lasers and starts spinning, but much faster than it did in the previous phase. Again, it is simple to avoid them by simply jumping, although the Talon Trot can also be used (which is not recomended, as when the duo eventually needs to switch to the Breegull Blaster mode, they'll be facing the wrong way and trotting around the tank too quickly will cause it to change directions, giving the two no chance to avoid the lasers).
Gruntilda will eventually stop, giving the duo a chance to attack. The way to damage her is the same as the one used in the previous phase.
Phase 3[edit]
In the third phase, Gruntilda will deactivate the lasers and activate a mortar cannon. To avoid the next attack, Banjo and Kazooie must use the Talon Trot and run around the Hag 1, which will spin and eventually stop to fire the cannon. It is easy to avoid the projectiles by jumping over them while still using the Talon Trot. When the Hag 1 stays still for longer than normal, the duo must face it for Gruntilda to then ask a question. Like in the previous instances, answering correctly will slow down her attack.
After she finishes attacking, use the Breegull Blaster to lower her health to 70.
Phase 4[edit]
In the fourth phase, Gruntilda will activate another mortar cannon. Her attacks will be mostly the same as the ones she used in the previous phase, but spinning faster, shooting larger projectiles and in four more directions. The way to avoid the attack is still the same, being to use keep moving and jumping over the projectiles while using the Talon Trot. Gruntilda will eventually ask a question again, and choosing the right answer will slow down her next attack.
Use the Breegull Blaster and shoot at Gruntilda again to get her health to 60 HP.
Phase 5[edit]
Gruntilda fetches the mortar cannons back, opens the exhaust port, activate two lasers in the front and activates the drill. She attacks similarly to how she did in the first phase, but due to the air coming out from the port, Banjo and Kazooie will recieve damage if coming in contact with it. The Hag 1 will attack by spinning around and then move forward to chase the duo. To avoid taking damage, use the Talon trot to try staying behind the tank for as much time as possible, until Gruntilda will pop out and ask a question that, like previously, choosing the wrong answer will make the next attack be faster.
Use the Breegull Blaster to shoot at Gruntilda and drop her health down to 50 HP, but watch out for the lasers which are still turned on and limit the area available to move. The engine will then falter, giving the opportunity to use the Clockwork Kazooie Egg to enter the exhaust port (which temporarily stopped releasing air) and explode a battery while avoiding enemies.
Phase 6[edit]
The sixth phase works much like the previous one, but faster, with all lasers active and changing directions more suddenly. Also like the previous phase, stay behind the tank to avoid being damaged. Gruntilda will then ask a question to give the duo the opportunity to make her next attack slower.
Again, shoot and bring her health down to 40 while watching out for the still activated lasers. The engine will get defective, giving another opportunity to use the Clockwork Kazooie Egg to enter inside the vehicle and explode another battery.
Phase 7[edit]
Now that both batteries are destroyed, the Hag 1 will shut down, making Gruntilda angry. She will then start shooting spells at Banjo and Kazooie. Use the Breegull Blaster to get her health down to 30.
Phase 8[edit]
Gruntilda will start sending Minions out of the hatch to attack the duo, giving more things to avoid while trying to shoot Eggs at her with the Breegull Blaster and drop her health to 15. These enemies can be used to get Honeycombs, seeing as they sometimes drop them when defeated and attacking one causes another to appear. To defeat them without wasting ammo, use the Beak Bayonet.
Phase 9[edit]
Gruntilda will release a purple "cyanide and mustard-flavored" toxic gas into the air and releasing two Minions, limiting Banjo and Kazooie's time to defeat her. This can be difficult without all 10 oxygen bubbles acquired from Roysten. Continue shooting eggs with the Breegull Blaster at her while avoiding the enemies to drop her health to 1.
Phase 10[edit]
Both the gas and the enemies disappear and Gruntilda starts to prepare the "biggest, baddest spell [she] can muster" and accidentally reveals her last name, Winkybunion. While she charges the spell, keep moving and shoot an egg at her. This will make her "drop" the spell inside the tank's hatch and explode the entire Hag 1 alongside herself, finally ending the battle.
Attack list[edit]
- Gruntilda
- Slow Green Fireball
- Fast Green Fireball
- Hyperspeed Purple Fireball
- Hag 1
- Lasers (one on each of the four corners)
- Mortar cannons
- The drill
- Infinite enemies
- Toxic gas
Banjo-Kazooie: Nuts & Bolts[edit]
In Banjo-Kazooie: Nuts & Bolts, the Hag 1 can be seen in the introduction of the game where a narrator is retelling the story of Banjo-Kazooie and Banjo-Tooie.
Gallery[edit]
Banjo-Tooie[edit]
The Hag 1 in the opening scene.
The Hag 1 preparing to attack Banjo and Kazooie.

Gruntilda inside the Hag 1.
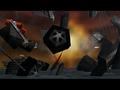
The Hag 1 explodes.


Nomenclature[edit]
| Language | Name | Meaning |
|---|---|---|
| French | Sorcière 1 | Witch 1 |
| German | Hag 1 Großer Gräßlicher Grubengräber |
Hag 1 Big Horrible Dug Digger |
| Italian | Strega 1 | Witch 1 |
| Japanese | マジョ1ごう モンスターメカニカルマッドマシン | Witch #1 Monster Mechanical Mud Machine |
| Spanish | Hag 1 Monstruo Mecánico Traga-Barro |
- Mud Swallowing Mechanical Monster |
Trivia[edit]
- A GB plate at the rear of Hag 1 is a nod to Great Britain, Rare Ltd.'s country of origin.