Be sure to read our policy on citing sources before editing!
Difference between revisions of "Mumbo's Mountain"
(→Items and collectibles: rewrite extra honeycomb descriptions) |
(reorganized) |
||
| (13 intermediate revisions by 3 users not shown) | |||
| Line 1: | Line 1: | ||
{{Infobox world | {{Infobox world | ||
|image=[[File:Mumbos Mountain view.png|300px]] | |image=[[File:Mumbos Mountain view.png|300px]] | ||
|game=''[[Banjo-Kazooie]]'' | |game=''[[Banjo-Kazooie]]''<br>''[[Banjo-Pilot]]''<br>''[[Banjo-Kazooie: Nuts & Bolts]]'' | ||
|theme=Tribal village | |theme=Tribal village | ||
|jiggies=1 | |jiggies=1 (''Banjo-Kazooie'') | ||
|transformation=[[Termite Banjo|Termite]] | |transformation=[[Termite Banjo|Termite]] (''Banjo-Kazooie'') | ||
}} | }} | ||
'''Mumbo's Mountain''' is | '''Mumbo's Mountain''' is a location in ''[[Banjo-Kazooie]]''. | ||
==Features and overview== | |||
Mumbo's Mountain takes place in a mountainous jungle area featuring a tribal village. It features a tall termite tower known as [[Ticker's Tower]], a structure resembling the {{wp|Stonehenge}}, a small river in the lowest area (with a wooden bridge over it), and two large slopes. | |||
===''Banjo-Kazooie''=== | |||
In ''Banjo-Kazooie'', Mumbo's Mountain is the first level, and its entrance is located just to the right of the entrance to [[Gruntilda's Lair]]. The [[Jigsaw Picture]] is located right next to the entrance beyond a small fenced area, with only one [[Jiggy]] being needed to complete it. In this world, [[Mumbo Jumbo]] and, by extension, [[Mumbo's Skull]] are found for the first time, and he can transform the duo into a [[termite Banjo|termite]] for 5 [[Mumbo Totem|Mumbo Tokens]]. The moves taught by [[Bottles]] are [[Beak Buster]], [[Egg Firing]] and [[Talon Trot]]. | |||
==Enemies== | ====Enemies==== | ||
{|class=wikitable width=15% | {|class=wikitable width=15% | ||
!width=5%|Image | !width=5%|Image | ||
| Line 24: | Line 26: | ||
|align=center|[[File:Bigbutt.png|100x100px]] | |align=center|[[File:Bigbutt.png|100x100px]] | ||
|align=center|[[Bigbutt]] | |align=center|[[Bigbutt]] | ||
|align=center|1 | |||
|- | |||
|align=center|[[File:Conga B-K render.png|100x100px]] | |||
|align=center|[[Conga]] | |||
|align=center|1 | |align=center|1 | ||
|- | |- | ||
| Line 35: | Line 41: | ||
|} | |} | ||
== | ====Pickups==== | ||
{|class=wikitable | {|class=wikitable | ||
!Image | !Image | ||
!Name | !Name | ||
!Amount | !Amount | ||
!Location | |||
|- | |- | ||
|[[File:Egg | |[[File:BK XBLA Blue Egg icon.png]] | ||
|[[Egg]] | |align=center|[[Egg]] | ||
|40 | |40 | ||
| - | |||
|- | |- | ||
|[[File:Extra Honeycomb | |[[File:BK XBLA Extra Honeycomb icon.png]] | ||
|[[Hollow Honeycomb|Extra Honeycomb Piece]] | |align=center|[[Hollow Honeycomb|Extra Honeycomb Piece]] | ||
|2 | |||
| | | | ||
*In a small alcove on a hill above the lake. The Extra Honeycomb Piece can be obtained as a [[Termite]] or by jumping down from the top of the hill carefully. | |||
*When one segment of Juju is left, Banjo must jump on it and perform [[Flap Flip]] with Kazooie to reach the Extra Honeycomb Piece. | |||
|- | |- | ||
|[[File:BK Extra Life | |[[File:BK XBLA Extra Life icon.png]] | ||
|[[Extra Life]] | |align=center|[[Extra Life]] | ||
|2 | |||
| | | | ||
*Atop Ticker's Tower. | |||
*Contained in one of the huts surrounding Juju. | |||
|- | |||
|[[File:BK XBLA Orange icon.png]] | |||
|align=center|[[Orange]] | |||
|1 | |||
| | |||
*Hanging from Conga's orange tree. | |||
|} | |} | ||
===Jiggies=== | ====[[Jiggy|Jiggies]]==== | ||
{|class="wikitable" | {|class="wikitable" | ||
!No. | !No. | ||
!width | !style="width:15%"|Official title (Player's Guide) | ||
!Description | !Description | ||
|- | |- | ||
|1 | |style="text-align:center"|1 | ||
|align | |style="text-align:center"|'''In a Shaman's Eye''' | ||
|The first [[Jiggy]] is in the right eye socket of Mumbo's Hut. Banjo and Kazooie can reach it by performing a Flap Flip. | |The first [[Jiggy]] is in the right eye socket of Mumbo's Hut. Banjo and Kazooie can reach it by performing a Flap Flip. | ||
|- | |- | ||
|2 | |style="text-align:center"|2 | ||
|align | |style="text-align:center"|'''Crash the Party''' | ||
|The second Jiggy is contained within a small hut around the Juju totem. Banjo and Kazooie must perform Beak Buster to release the Jiggy. | |The second Jiggy is contained within a small hut around the Juju totem. Banjo and Kazooie must perform Beak Buster to release the Jiggy. | ||
|- | |- | ||
|3 | |style="text-align:center"|3 | ||
|align | |style="text-align:center"|'''Run for the Ruins''' | ||
|On a small platform centered inside the Stonehenge-like structure. | |On a small platform centered inside the Stonehenge-like structure. | ||
|- | |- | ||
|4 | |style="text-align:center"|4 | ||
|align | |style="text-align:center"|'''The Way of the Trot''' | ||
|At the start and to the right is a steep slope with platforms. The fourth Jiggy is floating above one of the platforms, and it can be reached via Talon Trot or as [[Termite Banjo]]. | |At the start and to the right is a steep slope with platforms. The fourth Jiggy is floating above one of the platforms, and it can be reached via Talon Trot or as [[Termite Banjo]]. | ||
|- | |- | ||
|5 | |style="text-align:center"|5 | ||
|align | |style="text-align:center"|'''Orange Crush''' | ||
|There are three tiles depicting an orange that surround Conga's orange. Banjo must walk on a tile for Conga to throw an orange on it. When Conga throws an orange, Banjo must quickly move out of the way to avoid being hit. After doing this two more times, a Jiggy appears nearby. | |There are three tiles depicting an orange that surround Conga's orange. Banjo must walk on a tile for Conga to throw an orange on it. When Conga throws an orange, Banjo must quickly move out of the way to avoid being hit. After doing this two more times, a Jiggy appears nearby. | ||
|- | |- | ||
|6 | |style="text-align:center"|6 | ||
|align | |style="text-align:center"|'''Bear-ing Gifts''' | ||
|Banjo must climb up the orange tree, collect an [[orange]] and walk over to [[Chimpy]] with it. He takes the orange from Banjo and leaves a Jiggy behind. Chimpy goes off the stump, causing it to raise slightly and allowing Banjo and Kazooie to reach the higher ledges with [[Blue Egg|egg]]s and the Witch Switch. | |Banjo must climb up the orange tree, collect an [[orange]] and walk over to [[Chimpy]] with it. He takes the orange from Banjo and leaves a Jiggy behind. Chimpy goes off the stump, causing it to raise slightly and allowing Banjo and Kazooie to reach the higher ledges with [[Blue Egg|egg]]s and the Witch Switch. | ||
|- | |- | ||
|7 | |style="text-align:center"|7 | ||
|align | |style="text-align:center"|'''Gorilla Warfare''' | ||
|After collecting a Jiggy from Chimpy, Banjo and Kazooie must Flap Flip to a tree stump platform, It is straight across from Conga, who is standing on an orange tree around the same height. From the platform, Kazooie must fire seven eggs at Conga. After doing so, a Jiggy drops from the tree and on the ground. | |After collecting a Jiggy from Chimpy, Banjo and Kazooie must Flap Flip to a tree stump platform, It is straight across from Conga, who is standing on an orange tree around the same height. From the platform, Kazooie must fire seven eggs at Conga. After doing so, a Jiggy drops from the tree and on the ground. | ||
|- | |- | ||
|8 | |style="text-align:center"|8 | ||
|align | |style="text-align:center"|'''Termite Transformation''' | ||
|As a termite, Banjo must climb up the interior of Ticker's Tower. The exit is at the top, and it leads to the very top of to Ticker's Tower, which a Jiggy hovers above slightly. | |As a termite, Banjo must climb up the interior of Ticker's Tower. The exit is at the top, and it leads to the very top of to Ticker's Tower, which a Jiggy hovers above slightly. | ||
|- | |- | ||
|9 | |style="text-align:center"|9 | ||
|align | |style="text-align:center"|'''Shooting from the Lip''' | ||
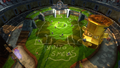
|Kazooie must fire an egg into the mouth of each Juju segment. The Juju spins slightly faster each time a segment breaks away. After Kazooie fires an egg into all four segments, a Jiggy is revealed. | |Kazooie must fire an egg into the mouth of each Juju segment. The Juju spins slightly faster each time a segment breaks away. After Kazooie fires an egg into all four segments, a Jiggy is revealed. | ||
|- | |- | ||
|10 | |style="text-align:center"|10 | ||
|align | |style="text-align:center"|'''The Jinjos Five''' | ||
|Banjo and Kazooie must find all five [[Jinjo]]s. | |Banjo and Kazooie must find all five [[Jinjo]]s. | ||
|} | |} | ||
=== | ====[[Jinjo]]s==== | ||
{|class="wikitable" | {|class="wikitable" | ||
|- | |- | ||
| Line 127: | Line 143: | ||
|} | |} | ||
===Witch Switch=== | ====Witch Switch==== | ||
{|class=wikitable | {|class=wikitable | ||
!Image | !Image | ||
| Line 133: | Line 149: | ||
|- | |- | ||
|[[File:Witch Switch of Mumbo's Mountain.png|200px]] | |[[File:Witch Switch of Mumbo's Mountain.png|200px]] | ||
|The [[Witch Switch]] is a | |The [[Witch Switch]] is on a tall stump across from the orange tree with Conga. Banjo can only reach it after giving an orange to Chimpy. After pounding the switch, a [[Jiggy]] appears on top of the mountain in the hub of [[Gruntilda's Lair]]. Banjo can only reach the Jiggy by leaving Mumbo's Mountain as a termite in order to scale up the mountain. | ||
|} | |} | ||
===[[Mumbo Token]]s=== | ====[[Mumbo Token]]s==== | ||
{|class=wikitable | {|class=wikitable | ||
!No. | !No. | ||
| Line 157: | Line 173: | ||
|} | |} | ||
==''Banjo- | ===''Banjo-Pilot''=== | ||
[[ | In ''[[Banjo-Pilot]]'', Mumbo's Mountain appears as a battle track. It can be bought from [[Cheato]] for 100 [[Cheato Page]]s. | ||
In ''[[Banjo-Kazooie: Nuts & Bolts]]'', the Stonehenge-like structure and the slope that it rests on were recreated for | ===''Banjo-Kazooie: Nuts & Bolts''=== | ||
In ''[[Banjo-Kazooie: Nuts & Bolts]]'', the Stonehenge-like structure and the slope that it rests on were recreated for [[Banjoland]]. It has a larger appearance and sits among the Kickball field, Golden Goliath and Targitzan on the top of the hill. | |||
==Gallery== | ==Gallery== | ||
===''Banjo-Kazooie''=== | |||
<gallery> | <gallery> | ||
Mumbo's Mountain entry.png|World entrance | Mumbo's Mountain entry.png|World entrance | ||
| Line 168: | Line 186: | ||
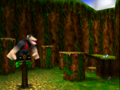
Mumbo's Mountain stonehenge.png|Stongehenge | Mumbo's Mountain stonehenge.png|Stongehenge | ||
Mumbo's Mountain Conga.png|Conga standing on an orange tree | Mumbo's Mountain Conga.png|Conga standing on an orange tree | ||
</gallery> | |||
===''Banjo-Kazooie: Nuts & Bolts''=== | |||
<gallery> | |||
N&B Stonehenge in Banjoland.png|The Stonehenge-like structure in Banjoland | |||
</gallery> | </gallery> | ||
| Line 176: | Line 198: | ||
|Fra= Montagne de Mumbo | |Fra= Montagne de Mumbo | ||
|FraM= Mumbo's Mountain | |FraM= Mumbo's Mountain | ||
|Spa= Montaña de Mumbo | |Spa= Montaña de Mumbo | ||
|SpaM= Mumbo's Mountain | |SpaM= Mumbo's Mountain (''Banjo-Kazooie: Nuts & Bolts'') | ||
|Jap=マンボまうんてん | |Jap=マンボまうんてん | ||
|JapM=Mumbo Mountain | |JapM=Mumbo Mountain | ||
| Line 185: | Line 207: | ||
==Trivia== | ==Trivia== | ||
*The theme that plays | *The theme that plays when Ticker's Tower was originally the theme for Mumbo's Mountain itself. However, as [[Chris Stamper]] did not like it, [[Grant Kirkhope]] had to redo the track and ended up using the old one for when Banjo and Kazooie enter the hill.<ref>[https://web.archive.org/web/20141027025050/http://www.grantkirkhope.com/banjokazooie.html Grant Kirkhope. Video Game Composer, Banjo Kazooie Video Games Music Compositions.]</ref> | ||
*Mumbo's Mountain is the only level that neither has a [[Flight Pad]] nor a [[Shock Jump Pad]]. By extension, it is the only level to not have any [[Red Feather]]s, and one of two levels with no [[Gold Feather]]s. | *Mumbo's Mountain is the only level that neither has a [[Flight Pad]] nor a [[Shock Jump Pad]]. By extension, it is the only level to not have any [[Red Feather]]s, and one of two levels with no [[Gold Feather]]s. | ||
*A recreated version of Mumbo's Mountain was used as a test level in ''Banjo-Kazooie: Nuts & Bolts'' for testing the vehicle mechanics.<ref>[https://www.youtube.com/watch?v=_R2sCzlT5Uc Rare Revealed: The Making of Banjo-Kazooie: Nuts & Bolts] on YouTube</ref> | *A recreated version of Mumbo's Mountain was used as a test level in ''Banjo-Kazooie: Nuts & Bolts'' for testing the vehicle mechanics.<ref>[https://www.youtube.com/watch?v=_R2sCzlT5Uc Rare Revealed: The Making of Banjo-Kazooie: Nuts & Bolts] on YouTube</ref> | ||
| Line 191: | Line 213: | ||
==References== | ==References== | ||
<references/> | <references/> | ||
{{BK}} | {{BK}} | ||
[[Category:Mountains]] | |||
[[Category:Worlds in Banjo-Kazooie]] | [[Category:Worlds in Banjo-Kazooie]] | ||
Latest revision as of 19:30, December 10, 2023

| |
| Game appearance(s) | Banjo-Kazooie Banjo-Pilot Banjo-Kazooie: Nuts & Bolts |
| Theme | Tribal village |
| Jiggy requirement | 1 (Banjo-Kazooie) |
| Transformation | Termite (Banjo-Kazooie) |
Mumbo's Mountain is a location in Banjo-Kazooie.
Features and overview[edit]
Mumbo's Mountain takes place in a mountainous jungle area featuring a tribal village. It features a tall termite tower known as Ticker's Tower, a structure resembling the Stonehenge, a small river in the lowest area (with a wooden bridge over it), and two large slopes.
Banjo-Kazooie[edit]
In Banjo-Kazooie, Mumbo's Mountain is the first level, and its entrance is located just to the right of the entrance to Gruntilda's Lair. The Jigsaw Picture is located right next to the entrance beyond a small fenced area, with only one Jiggy being needed to complete it. In this world, Mumbo Jumbo and, by extension, Mumbo's Skull are found for the first time, and he can transform the duo into a termite for 5 Mumbo Tokens. The moves taught by Bottles are Beak Buster, Egg Firing and Talon Trot.
Enemies[edit]
| Image | Enemy | Count |
|---|---|---|

|
Beehive | 2 |

|
Bigbutt | 1 |

|
Conga | 1 |

|
Grublin | 5 |
.png)
|
Ticker | 7 |
Pickups[edit]
| Image | Name | Amount | Location |
|---|---|---|---|
| Egg | 40 | - | |
| Extra Honeycomb Piece | 2 | ||
| Extra Life | 2 |
| |
| Orange | 1 |
|
Jiggies[edit]
| No. | Official title (Player's Guide) | Description |
|---|---|---|
| 1 | In a Shaman's Eye | The first Jiggy is in the right eye socket of Mumbo's Hut. Banjo and Kazooie can reach it by performing a Flap Flip. |
| 2 | Crash the Party | The second Jiggy is contained within a small hut around the Juju totem. Banjo and Kazooie must perform Beak Buster to release the Jiggy. |
| 3 | Run for the Ruins | On a small platform centered inside the Stonehenge-like structure. |
| 4 | The Way of the Trot | At the start and to the right is a steep slope with platforms. The fourth Jiggy is floating above one of the platforms, and it can be reached via Talon Trot or as Termite Banjo. |
| 5 | Orange Crush | There are three tiles depicting an orange that surround Conga's orange. Banjo must walk on a tile for Conga to throw an orange on it. When Conga throws an orange, Banjo must quickly move out of the way to avoid being hit. After doing this two more times, a Jiggy appears nearby. |
| 6 | Bear-ing Gifts | Banjo must climb up the orange tree, collect an orange and walk over to Chimpy with it. He takes the orange from Banjo and leaves a Jiggy behind. Chimpy goes off the stump, causing it to raise slightly and allowing Banjo and Kazooie to reach the higher ledges with eggs and the Witch Switch. |
| 7 | Gorilla Warfare | After collecting a Jiggy from Chimpy, Banjo and Kazooie must Flap Flip to a tree stump platform, It is straight across from Conga, who is standing on an orange tree around the same height. From the platform, Kazooie must fire seven eggs at Conga. After doing so, a Jiggy drops from the tree and on the ground. |
| 8 | Termite Transformation | As a termite, Banjo must climb up the interior of Ticker's Tower. The exit is at the top, and it leads to the very top of to Ticker's Tower, which a Jiggy hovers above slightly. |
| 9 | Shooting from the Lip | Kazooie must fire an egg into the mouth of each Juju segment. The Juju spins slightly faster each time a segment breaks away. After Kazooie fires an egg into all four segments, a Jiggy is revealed. |
| 10 | The Jinjos Five | Banjo and Kazooie must find all five Jinjos. |
Jinjos[edit]
| Color | Location |
|---|---|
Blue |
On an island in the middle of the river. |
Green |
Inside one of the small huts surrounding Juju. |
Orange |
Standing on the left edge on top of the Stonehenge-like structure. |
Purple |
Standing on a platform near the Start/Exit Pad. |
Yellow |
On a slope between the Stonehenge-like structure and the orange tree |
Witch Switch[edit]
| Image | Location |
|---|---|

|
The Witch Switch is on a tall stump across from the orange tree with Conga. Banjo can only reach it after giving an orange to Chimpy. After pounding the switch, a Jiggy appears on top of the mountain in the hub of Gruntilda's Lair. Banjo can only reach the Jiggy by leaving Mumbo's Mountain as a termite in order to scale up the mountain. |
Mumbo Tokens[edit]
| No. | Location |
|---|---|
| 1 | Behind the purple Jinjo |
| 2 | On a tall stump to the left of the orange tree |
| 3 | On a small ramp at the bottom of Ticker's Tower |
| 4 | Behind the Stonehenge-like structure |
| 5 | Under the small ramp to Mumbo's Hut |
Banjo-Pilot[edit]
In Banjo-Pilot, Mumbo's Mountain appears as a battle track. It can be bought from Cheato for 100 Cheato Pages.
Banjo-Kazooie: Nuts & Bolts[edit]
In Banjo-Kazooie: Nuts & Bolts, the Stonehenge-like structure and the slope that it rests on were recreated for Banjoland. It has a larger appearance and sits among the Kickball field, Golden Goliath and Targitzan on the top of the hill.
Gallery[edit]
Banjo-Kazooie[edit]
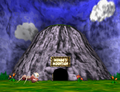
World entrance
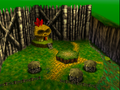
The village and Mumbo's Skull

Stongehenge
Conga standing on an orange tree


Banjo-Kazooie: Nuts & Bolts[edit]
The Stonehenge-like structure in Banjoland

Names in other languages[edit]
| Language | Name | Meaning |
|---|---|---|
| French | Montagne de Mumbo | Mumbo's Mountain |
| German | Mumbo's Mountain | Mumbo's Mountain |
| Italian | Montagna di Mumbo | Mumbo's Mountain |
| Japanese | マンボまうんてん Manbo Maunten |
Mumbo Mountain |
| Spanish | Montaña de Mumbo | Mumbo's Mountain (Banjo-Kazooie: Nuts & Bolts) |
Trivia[edit]
- The theme that plays when Ticker's Tower was originally the theme for Mumbo's Mountain itself. However, as Chris Stamper did not like it, Grant Kirkhope had to redo the track and ended up using the old one for when Banjo and Kazooie enter the hill.[1]
- Mumbo's Mountain is the only level that neither has a Flight Pad nor a Shock Jump Pad. By extension, it is the only level to not have any Red Feathers, and one of two levels with no Gold Feathers.
- A recreated version of Mumbo's Mountain was used as a test level in Banjo-Kazooie: Nuts & Bolts for testing the vehicle mechanics.[2]